Using the GUI - Automation
Quick links
- Main Window
- Module Control
- Pin Control
- On this page:
Automation Sequence Introduction
Automation sequences allow for automated control of modules based on various triggers.
Here is an example of a simple automation sequence to show how it looks when a sequence is running:
- Trigger: Manual
- Action: Delay 250 ms
- Action: Delay 500 ms
- Action: Delay 750 ms
- Repeat/Don’t repeat (depending on repeat setting)
Automation Sequence Manager
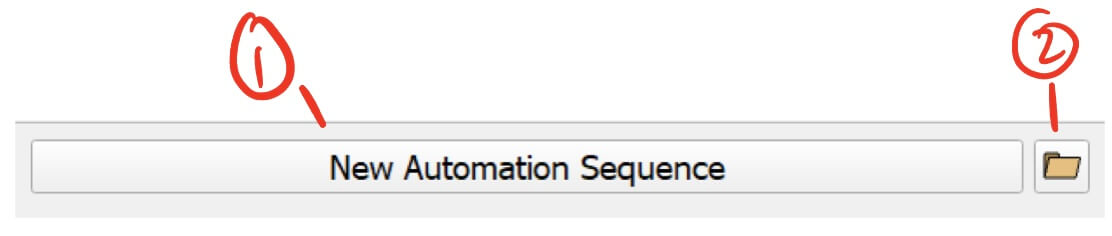
- New Automation Sequence - Creates a new automation sequence.
- Load Automation Sequence - Loads a saved automation sequence .json file
Automation Sequence
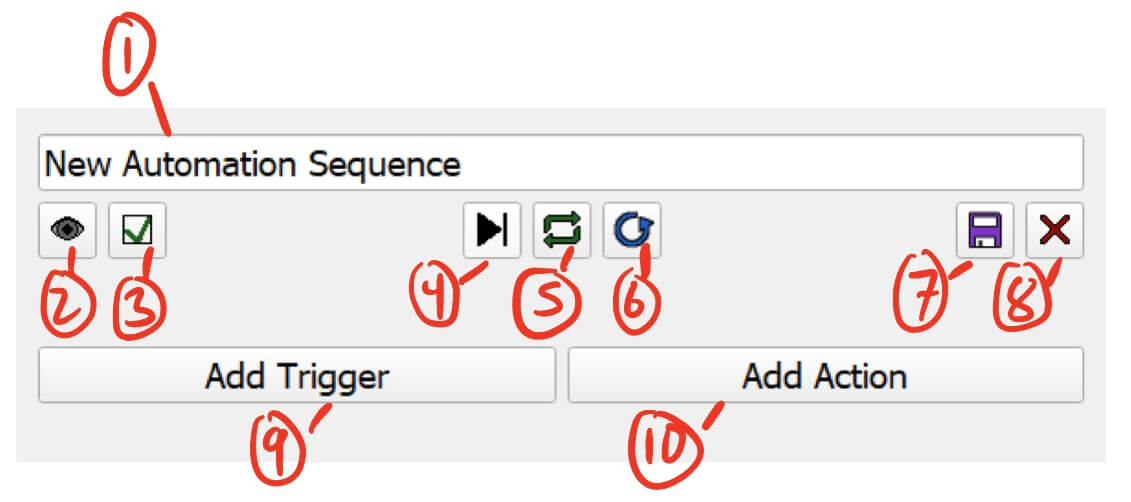
- Sequence Name - Edit this to change the name of the sequence.
- Visibility Button - Toggles the visibility of the sequence.
- The sequence will still run when hidden.
- Enable Button - Toggles if the sequence is enabled.
- The sequence will not run when disabled.
- Next Button - Skips to the next automation in the sequence.
- Repeat Button - Toggles if the sequence will repeat.
- When repeat is enabled, the sequence will automatically loop back around to the first automation after the sequence ends.
- When repeat is disabled, the sequence will stop when the sequence ends. You will have to press the Restart Button in order to restart the sequence.
- Restart Button - Restarts the sequence from the first automation.
- Save Button - Saves the sequence as a .json file.
- Delete Button - Deletes the sequence.
- Add Trigger Button - Opens the Add Trigger window.
- Triggers are automations that wait for specific events.
- The available triggers are:
- Serial Message - Waits for a user-defined message from one of the connected serial devices.
- Module - Waits for module-specific events.
- Pin - Waits for pin-specific events.
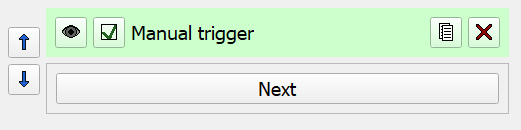
- Manual - Waits for the user to press the button.
- Add Action Button - Opens the Add Action window.
- Actions are automations that perform specific actions.
- The available actions are:
- Time Delay - Pauses the sequence for a user-defined amount of time before continuing to the next automation.
- Module - Executes module-specific actions.
- Pin - Executes pin-specific actions.
- Alert - Pops up an alert with a user-defined message.
- Email - Sends an email, can include module data.
Automations
Automations for both triggers and actions are structured like this:
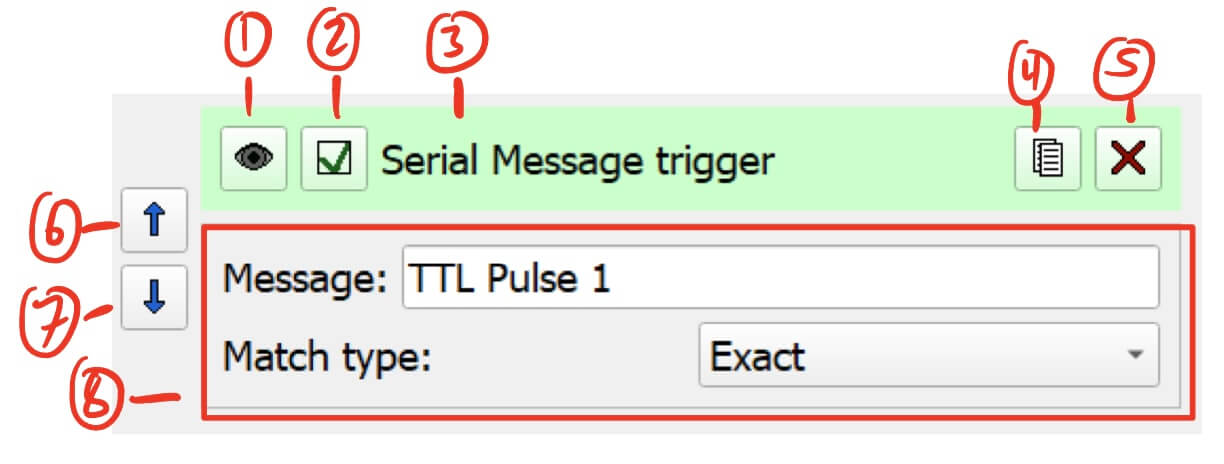
The current active automation will be highlighted green.
- Visibility Button - Toggles the visibility of the automation.
- The automation will still run when hidden.
- Enable Button - Toggles if the automation is enabled.
- The automation will be skipped when disabled.
- Automation Name - The automation’s name.
- Duplicate Button - Duplicates the automation.
- Delete Button - Deletes the automation.
- Move Up Button - Moves the automation up in the sequence.
- Move Down Button - Moves the automation down in the sequence.
- Automation Contents - The contents of the automation. This is different for each type of automation.
Triggers
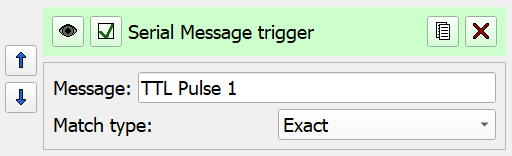
Serial Message Trigger
The serial message trigger listens to all of the serial devices connected through the Port Manager. The automation is triggered when a serial message matches the user-defined message.
Parameters
- Message - The user-defined message this trigger is listening for
- Match type - The way the serial message has to match the user-defined message.
- Exact - The serial message is exactly the same as the user-defined message.
- E.g. “TTL Pulse 1” exactly matches “TTL Pulse 1”
- Contains - The serial message contains the user-defined message.
- E.g. “TTL Pulse 1” contains “Pulse”
- Starts with - The serial message starts with the user-defined message.
- E.g. “TTL Pulse 1” starts with “TTL”
- Ends with - The serial message ends with the user-defined message.
- E.g. “TTL Pulse 1” ends with “Pulse 1”
- Exact - The serial message is exactly the same as the user-defined message.
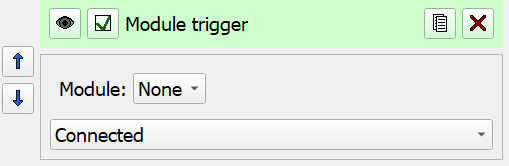
Module Trigger
The module trigger listens for certain module-specific events. This can be for a single module or any connected module.
Parameters
- Module - The connected module to listen to.
- Select
Anyto listen to all of the connected modules.
- Select
- Events
- Connected - The module was connected via Bluetooth.
- Disconnected - The module was disconnected via Bluetooth.
- Reset - The module was reset.
- Battery Percentage - The module’s battery percentage is compared to a user-defined value.
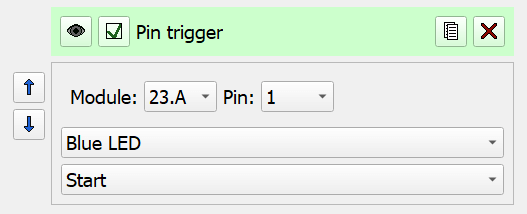
Pin Trigger
The pin trigger listens for certain pin-specific events. This can be for a single module or any connected module.
Parameters
- Module - The connected module to listen to.
- Select
Anyto listen to all of the connected modules.
- Select
- Pin - The module’s pin to listen to.
- Pin Types
- Blue/Green/Red LED
- Start - The LED pulse waveform has started.
- Stop - The LED pulse waveform has stopped.
- Pulse - The pulsing segment of the LED pulse waveform has started.
- Rest - The resting segment of the LED pulse waveform has started.
- On - The LED has turned on manually.
- Off - The LED has turned off manually.
- Heater
- Start - The heater pulse has started.
- Stop - The heater pulse has stopped.
- On - The heater has turned on manually.
- Off - The heater has turned off manually.
- Temperature - The pin temperature is compared to a user-defined value.
- Voltage - The pin voltage is compared to a user-defined value.
- Resistance - The pin resistance is compared to a user-defined value.
- Blue/Green/Red LED
Manual Trigger
The manual trigger provides a button for the user to press to manually progress the sequence.
Actions
Time Delay Action
The time delay action delays the sequence for a user-defined amount of time, then resumes the sequence once complete.
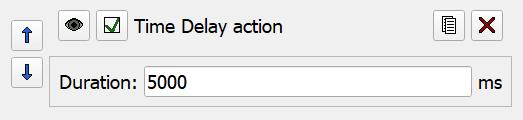
Parameters
- Duration (ms) - The amount of time to delay the sequence.
Module Action
Module actions are module specific actions, and can also affect multiple pins at once. This can be for a single module or all connected modules.
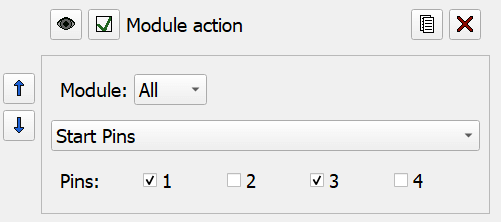
Parameters
- Module - The connected module to perform this action on.
- Select
Allto apply this to all of the connected modules.
- Select
- Actions
- Start Pins - Starts the selected pins on the module.
- Stop Pins - Stops the selected pins on the module.
- Reset - Resets the module.
- Export Data - Exports the module’s data.
- Choose folder… - Choose the folder to export the data to.
- Clear Data - Clears the module’s data.
Pin Action
Pin actions are pin-specific actions. This can be for a single module or all connected modules.
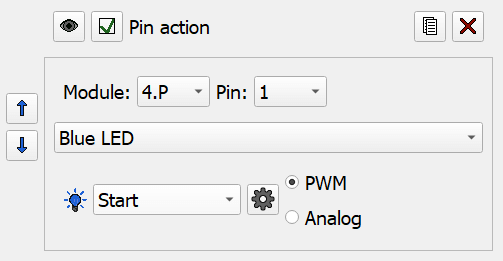
Parameters
- Module - The connected module to perform this action on.
- Select
Allto apply this to all of the connected modules.
- Select
- Pin - The module’s pin to perform this action on.
- Pin Types
- Blue/Green/Red LED
- Actions
- Start - Starts the LED pulse waveform.
- Stop - Stops the LED pulse waveform.
- On - Turns the LED on.
- Off - Turns the LED off.
- Apply Settings - Applies the settings configured by the settings button. See LED Pin Settings for more details.
- Settings Button - Opens up a settings menu exclusively for this automation.
- PWM/Analog - Be sure to select the correct module type when using “Apply Settings”. This doesn’t matter when doing other actions, such as “Start”.
- Actions
- Heater
- Actions
- Start - Starts the heater pulse.
- Stop - Stops the heater pulse.
- On - Turns the heater on.
- Off - Turns the heater off.
- Apply Settings - Applies the settings configured by the settings button. See Heater Pin Settings for more details.
- Settings Button - Opens up a settings menu exclusively for this automation.
- PWM/Analog - Be sure to select the correct module type when using “Apply Settings”. This doesn’t matter when doing other actions, such as “Start”.
- Actions
- Temperature
- Actions
- Start - Starts recording temperature.
- Stop - Stops recording temperature.
- Take Reading - Makes a single temperature measurement.
- Apply Settings - Applies the settings configured by the settings button. See Temperature Pin Settings for more details.
- Settings Button - Opens up a settings menu exclusively for this automation.
- PWM/Analog - Be sure to select the correct module type when using “Apply Settings”. This doesn’t matter when doing other actions, such as “Start”.
- Actions
- Voltage
- Actions
- Start - Starts recording voltage.
- Stop - Stops recording voltage.
- Take Reading - Makes a single voltage measurement.
- Apply Settings - Applies the settings configured by the settings button. See Voltage Pin Settings for more details.
- Settings Button - Opens up a settings menu exclusively for this automation.
- PWM/Analog - Be sure to select the correct module type when using “Apply Settings”. This doesn’t matter when doing other actions, such as “Start”.
- Actions
- Resistance
- Actions
- Start - Starts recording resistance.
- Stop - Stops recording resistance.
- Take Reading - Makes a single resistance measurement.
- Apply Settings - Applies the settings configured by the settings button. See Resistance Pin Settings for more details.
- Settings Button - Opens up a settings menu exclusively for this automation.
- PWM/Analog - Be sure to select the correct module type when using “Apply Settings”. This doesn’t matter when doing other actions, such as “Start”.
- Actions
- Blue/Green/Red LED
Alert Action
The alert action pops up an alert with a user-defined message. The sequence will pause until the user dismisses the alert.
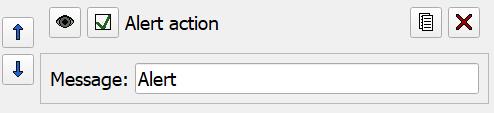
Parameters
- Message - The message to display in the alert.
Email Action
The email action will send an email to specified email addresses and can include the data from all of the modules.
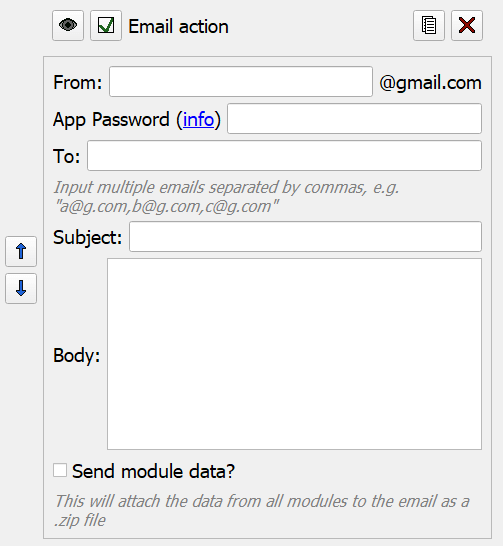
Parameters
- From - The email address the email will be sent from.
- This must be a Gmail address.
- App Password - In order to use the email action, you must generate an app password.
- Do NOT use your regular password, only a generated app password.
- Be warned that saving the automation sequence will store the app password in the generated .json file, so be careful not to share automation sequences that contain your app password!
- I recommend clearing out the “From” and “App Password” fields when sharing an automation sequence that uses an email action.
- To - Email addresses that the email should be sent to.
- You can input multiple email addresses separated by commas (no spaces). For example, “myemail@gmail.com,anotheremail@mit.edu”
- These email addresses do not need to be Gmail addresses.
- Subject - The email’s subject line.
- Body - The email’s body.
- Send module data - Check this to send data from every module.
- This will export the data from every module that is listed, even if they are disconnected.
Examples
Here I have prepared automation sequence examples for you to download and try out.
Send data when low on battery
- Requirements:
- Blue dev board connected via Port Manager
- One connected module
- Module Trigger - Wait for the battery on Module 4.P to go below 5%
- Module Action - Stop all of the pins on Module 4.P
- Email Action - Send an email notifying that Module 4.P has run out of battery, and include the module’s data
Download Send data when low on battery.json

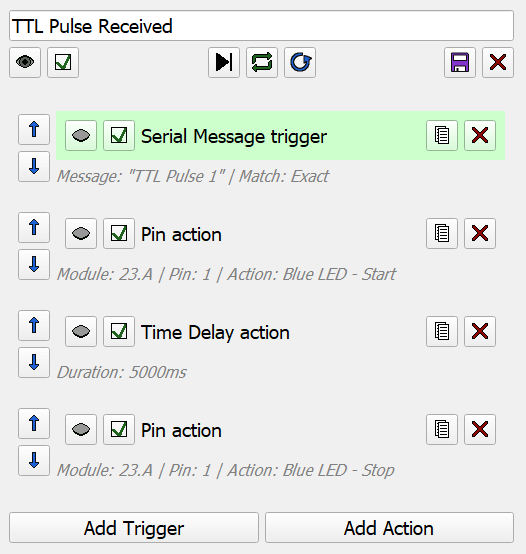
TTL Pulse Received
- Requirements:
- Blue dev board connected via Port Manager
- An Arduino UNO running TTL-Detector.zip and connected via the Port Manager
- One connected module with an LED pin
- Serial Message Trigger - Wait for the exact message “TTL Pulse 1” to come over serial
- Pin Action - On Module 23.A Pin 1 start the Blue LED
- Time Delay Action - Delay for 5000 ms (5 seconds)
- Pin Action - On Module 23.A Pin 1 stop the Blue LED
- Repeat
Download TTL Pulse Received.json
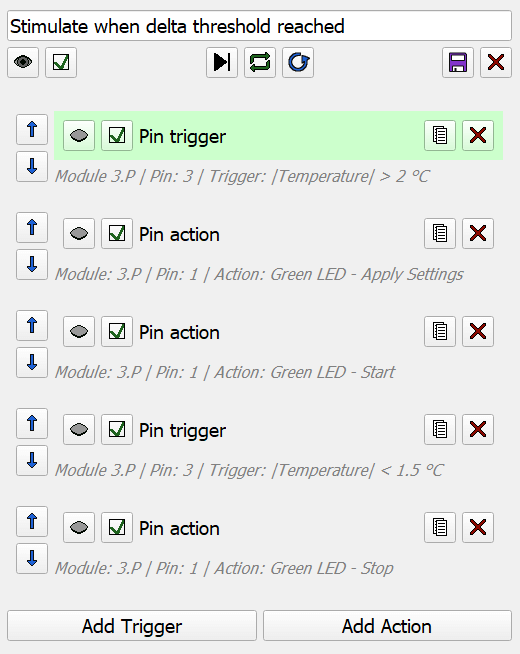
Stimulate when delta threshold reached
- Requirements:
- Blue dev board connected via Port Manager
- One connected module with two temperature pins in delta mode
- Pin Trigger - Wait for the absolute value of the temperature measurement on Module 3.P Pin 3 (the primary pin) to be greater than 2°C
- Pin Action - On Module 3.P Pin 1 apply the Green LED settings
- Pin Action - On Module 3.P Pin 1 start the Green LED
- Pin Trigger - Wait for the absolute value of the temperature measurement on Module 3.P Pin 3 (the primary pin) to be less than 1.5°C
- Pin Action - On Module 3.P Pin 1 stop the Green LED
- Repeat
Download Stimulate when delta threshold reached.json
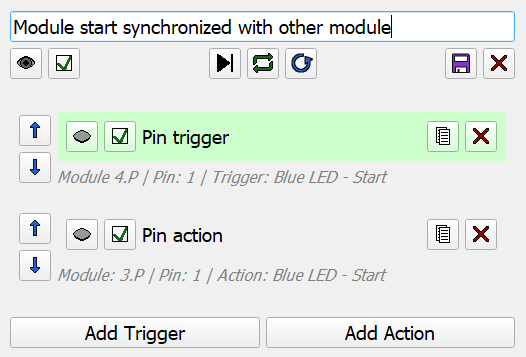
Module start synchronized with other module
- Requirements:
- Blue dev board connected via Port Manager
- Two connected modules each with an LED pin
- Pin Trigger - Wait for the Blue LED on Module 4.P Pin 1 to start
- Pin Action - On Module 3.P Pin 1 start the Blue LED
- Repeat
Download Module start synchronized with other module.json
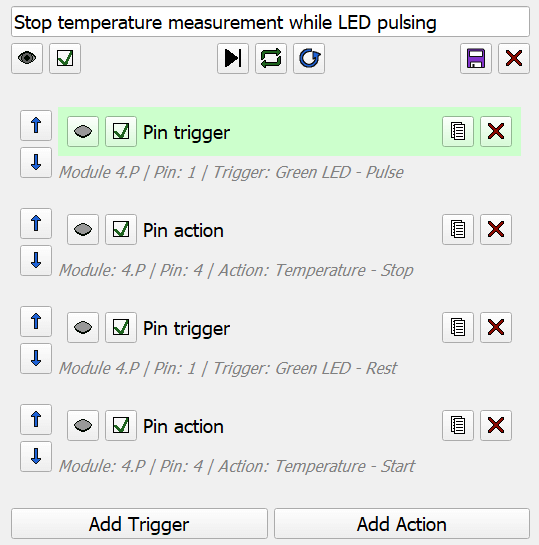
Stop temperature measurement while LED pulsing
- Requirements:
- Blue dev board connected via Port Manager
- One connected module with an LED pin and a temperature pin
- Pin Trigger - Wait for the Blue LED on Module 4.P Pin 1 to pulse
- Pin Action - On Module 4.P Pin 4 stop recording temperature
- Pin Trigger - Wait for the Blue LED on Module 4.P Pin 1 to rest
- Pin Action - On Module 4.P Pin 4 start recording temperature
- Repeat
Download Stop temperature measurement while LED pulsing.json